Back to products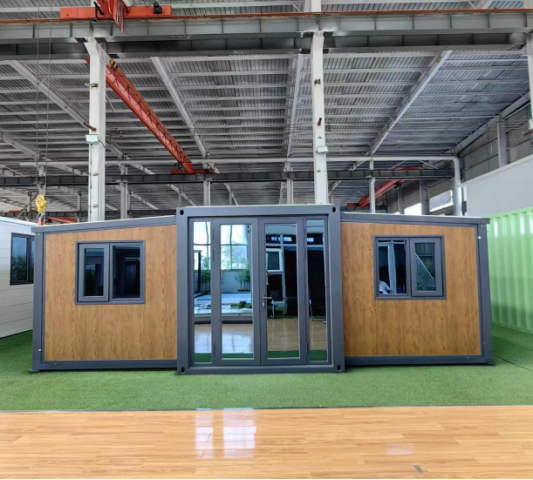
expandable container house
Double-Wing Extended Housing
Model: E700 · 15ft / 20ft / 30ft / 40ft
An innovative expandable house inspired by the natural shape of outstretched wings — delivered flat-packed, unfolded into a spacious, well-ventilated and flexible living space on site.
- Installation videos
- 34
Description
I. Product Introduction
The "Double-Wing Expansion House" is an innovative residential design concept that has garnered significant attention due to its unique structural design and spatial utilization approach. Inspired by the natural shape of outstretched wings, this design employs wing spans on both sides of the structure to create a more spacious, well-ventilated, and flexible living environment.
II. Pre-installation Preparation
Before installation, a level ground surface or support points are required; the surface must be perfectly level. The main structure of the house should be placed directly on the ground. The 20-foot winged expandable house can be placed directly on a level surface, whereas for the 40-foot winged expandable house, support points of 80 mm thickness are required on both sides, with a minimum of three support points on each side. Depending on the specific ground conditions, it may be necessary to install a foundation using piles (this is generally required for soft ground conditions such as sandy beaches or muddy soil).
III. Preparation Requirements
• In the absence of a manual winch, at least six personnel are required for installation;
• You will need to prepare gloves, a helmet, a power drill, an electric wrench, or a conventional wrench, among other tools;
• When beginning to open the roof panel, after creating a gap in the roof panel, ensure that at least two personnel are present to manually support the internal upright panels, and then inspect the internal upright panels for any signs of movement; also verify that the internal pin mechanism is in the locked position or free of damage. This precaution is necessary to prevent the folding-face pin mechanism inside the roof panel from becoming damaged after the roof panel has risen, which could lead to a fall and cause an accident.
IV. Parts List (Table 1)
• Two boxes of structural adhesive (one white and one gray) — It can be used for reinforcement and bonding of wall panels, ceiling covers, and gaps in doors and windows to prevent water and air leakage.
• 1 glue gun — Tool used for applying or extruding adhesive
• 20 gray rivets — Install wall panels
• 25# nails: 20 pieces — Install exterior wall panels and secure the lighting fixtures.
• 6# nails: 20 pieces — Install the roof covering
• Waterproof tape, 15 meters — Waterproof, airtight, and insulating; suitable for use at the seams of wall panels.
• 1 Phillips screwdriver bit — Used to tighten or loosen cross-head screws.
• D-shaped sealing strip, 12 m — Designed for outdoor gap sealing; provides vibration damping, waterproofing, sound insulation, and dustproofing.
• M10×30 screws, 20 each of flat head and socket heads — For securing the four corners of the wall panels.
• 2 bedroom door lock cylinders (Based on the number of bedrooms) — Key components of the lock control mechanism
• 2 bedroom door handles (Based on the number of bedrooms) — Making it easier and more convenient to open and close doors.
• Main entrance door key — Opens the main entrance door.
• 8 window handles (Based on the number of windows purchased) — Help open and close windows
• 4 aluminum strips — For sealing floor gaps
• 6 pieces of 40×60 timber offcuts — Placed under the four bottom corners to keep the house level.
• 2 sealing caps — Used to plug the bolt holes in the roof; provides a sealing function.
• 1 roll of thread seal tape (PTFE) — Wrapped around the faucet threads to prevent leaks.
• 1 outdoor industrial male plug — Main power supply connector for the indoor main line.
• Main entrance door trim kit (available upon request) — Fix door panels, protect wall corners, and apply decorative finishes
V. Important Notice
• This product has a relatively heavy wall; please exercise caution during installation.
• The product may leak before installation; if it rains, protective measures should be taken.
Installation steps
Step 1: Unfold the main wall panels on both sides
First, remove the packaging and the transport fastening screws; next, hoist or support the outermost top covers on both sides of the house; then, release the fastening devices (pins) on the inner bottom surfaces; slowly lower the floor; subsequently, remove the side wall panels; finally, unfold the front and rear wall panels, as shown in the figure below or referenced in the video. "Please refer to the house unfolding video."
Step 2: Secure the exterior wall panel screws
Secure the fastening screws around the exterior wall panels of the building; if the pre-drilled bolt holes are misaligned, slightly adjust the height of the adjacent spacer plates until the screws can be properly inserted.
Step 3: Inspect the sealing tape at the roof joints
Inspect the waterproof sealing tape at the joint between the side roof slab and the main roof for any damage; if damage is found, reapply the sealant and securely reattach the waterproof sealing tape; then apply sealant at both ends of the joint and reattach the waterproof sealing tape.
Step 4: Seal the roof centre-to-side-wing joints
For E700/20ft/30ft/15ft sizes (excluding 30ft/40ft), after unfolding the housing, apply sealant at the junction between the center of the top panel and the side panels, and then attach waterproof tape.
Step 5: Seal the indoor gaps
Apply adhesive to indoor gaps using an adhesive gun.
Step 6: Install the door and window handles
When installing handles for the main entrance door, bedroom doors, and windows, please refer to the handle installation video.
Step 7: Install the door frame fitting
Install the door frame fitting on the left side of the doorway; please refer to the door frame installation video.
Step 8: Install the floor expansion strips
For installing floor expansion strips, please refer to the video on installing floor expansion strips.
Step 9: Install the sockets and switches
Installing sockets/switches: "Please refer to the socket installation video."